3000+ Pumps & Parts
Pumps On Sale!
Fast Dispatch

As autumn arrives in Western Australia, it’s the perfect time to inspect and service your pumps before cooler weather sets in. Don’t kid yourself into thinking “it will be fine” – skipping maintenance is a recipe for unexpected breakdowns. Autumn brings drier days and the end of the high-demand irrigation season, making it an ideal “reset point” to clean, tune, and protect your pump systems. Whether you rely on a garden water pump, a pressure-boosting pressure pump, or a progressive cavity pump on the farm, thorough checks now save time and money later. Follow this complete checklist to catch leaks, clogs, and wear before they escalate into failures.
Autumn in WA often means shifting weather patterns and dropping water use but pumps don’t just maintain themselves. Cooler temperatures can expose hidden issues: small leaks or loose clamps that were tolerable in summer can cause prime failures and motor trips once flow demands change. Long-term trends show cool-season rainfall is declining in southwest WA, making reliable pump performance even more crucial. In other words, don’t bluff your way through. A pumped-up system that’s neglected now can leave you high and dry later, especially when you need it most. Use this checklist to cover all bases:
Inspect the entire pump station (look for leaks, corrosion, vibration).
Check drainage, sump pits, and float switches (flooding here can instantly kill reliability).
Clean and test filters/strainters to prevent blockages.
Exercise isolation valves and check gauge accuracy.
Autumn is your chance to “clean and protect the pump system and remove avoidable breakdown causes” before winter’s workload starts. Be ruthless: if something is loose or worn, fix it now.
Start with a systematic walk-around all pump installations (irrigation station, pool pump area, household pressure system, etc.). You’re looking for “silent failures” leaks, rust spots, loose fittings, or water where it shouldn’t be.
Visual check for leaks and damage: Inspect pump housings, connections, and nearby pipes. Look for puddles or stains even a tiny drip means inefficiency and risk. Listen for unusual noises or vibration which hint at misalignment or failing bearings.
Check pipe fittings and clamps: Tighten any loose hose clamps or unions. Replace cracked hose sections or faulty foot valves on suction lines to prevent air leaks (even small air pockets can cause pumps to lose prime in cold mornings).
Inspect electrical safety: Treat wiring and control panels as professional territory WA law requires licensed electricians for fixed electrical work. Still, you can check that cables are secure and protected, and that control box covers are intact. Any rust or burn marks on wiring need expert attention.
Examine sumps and pits: For any pumps drawing from wells, tanks, or pits, ensure float switches aren’t sticking and drains are clear. Remove any debris or mud that could drown out the pump. A flooded pump pit is a ticking failure bomb.
Clear filters and strainers: Debris from plants and sediment can clog intake screens over summer. Clean or replace all filters remember that even a slight blockage will reduce pressure and flow.
Exercise valves: Open and close each isolation and check valve a few times. Stuck valves waste your effort and can cause pressure swings.
Each of these steps catches issues before they cause breakdowns. Neglect at this point only wastes time and money later – in autumn, be meticulous.
Water pumps (centrifugal or submersible for household or farm use) have common requirements every season:
Confirm proper priming: If your pump is not self-priming, be sure to fill the pump body and suction line completely through the priming port, then test that the pump establishes prime quickly. Don’t run a pump half-primed or dry – doing so causes erratic flow, overheating, and premature wear. If the pump won’t stay primed, hunt down suction leaks or a missing foot valve.
Inspect impeller and seals: Remove the pump cover (after shutting off power!) and check the impeller for debris or wear. Look at mechanical seals and gaskets for any sign of water weeping through. Replace worn seals – don’t assume they’ll last forever. Manufacturers note that about 25% of PCP repairs are seal-related.
Check suction lines and valves: A loose suction pipe fitting may let in air while you don’t see water leaking out – a common frustration on farms. Replace suspect suction hoses or worn-out clamps now. Ensure foot valves or check valves are intact and not clogged; without one, a pump loses prime easily.
Clean pump exterior: Wash off mud or dust that accumulated during summer. If your water pump has cooling fins or vents (on the motor), keep them clear of debris so the motor doesn’t overheat.
Test run: Turn on the pump (after adding water back) and observe pressure and flow. Make sure it starts smoothly and runs quietly. If it still hums or bogs under normal conditions, dig deeper – you might need a rebuild or stronger pump.
Skipping these basic checks on a water pump might feel tempting, but it’s foolhardy. Pumps are cheap; emergency repairs are not.
A pressure pump (also called a booster pump or pressure booster) deserves careful attention, especially if it supports household water or irrigation. Follow this step-by-step checklist:
Visual Inspection: Look around the pump for puddles or stains. Listen while it runs for unusual noise or vibration. Ensure the pump and motor alignment haven’t shifted (loose bolts can cause misalignment).
Check Electrical Connections: Open the control panel and check all terminals. They should be tight, clean, and cool (no signs of arcing). Also inspect the control unit or PLC: clear any error codes, and confirm that motor starters and overload relays function properly.
Lubricate Bearings and Moving Parts: If the pump or motor has grease points, add the recommended lubrication. If there’s an oil reservoir, verify oil level and quality. Then start the pump briefly: it should spin up smoothly without growling sounds or smoke.
Suction and Discharge Lines: Check both for corrosion or dents. Make sure all valves are in the correct open/closed position. Swap out corroded fittings. Verify pressure gauges on both sides – their readings should match expected system pressure when running.
Inspect Seals and Gaskets: Look for drips around the shaft seal or casing joints. Any visible “weeping” means replacing the seal or gasket is overdue. Ensure the check valve on the pump outlet isn’t sticking (lift it by hand if possible).
Record Everything: Keep a log of all findings, maintenance performed, and dates. This historical data is your insurance: it helps diagnose future problems and proves compliance if needed.
Following this routine prevents common booster pump issues. Trust the data: well-maintained pressure pumps last longer and save energy, whereas ignoring these steps leads to costly repairs.
Progressive cavity pumps (often used for viscous fluids or irrigation) need extra TLC because wear happens differently:
Check Rotor and Stator: Open the pump as the manufacturer suggests. Stators (the rubber lining) wear out faster than rotors. Inspect the rubber lining for thin spots or deformation. Replace the stator if any damage is visible. As a rule of thumb, plan to replace the metal rotor after every two stator changes to maintain efficiency.
Inspect Seals and Couplings: Progressive cavity pumps often have mechanical seals. Some modern designs allow seal replacement without disassembling the motor, but if not, you may need to remove the rotor shaft. Either way, check seals for leakage and replace them proactively (they account for ~25% of repairs). Check the flexible coupling (universal joint) for play or wear a failing coupling can knock the pump out of alignment.
Lubrication: Apply appropriate lubricant (castor oil is often recommended) to the rotor before reinserting into the stator. The right lubricant prevents the rubber stator from swelling and ensures a smooth fit. After assembly, ensure any pump-bearing housing is greased per manufacturer specs.
Clean and Flush: To clean out any residue, cover the suction and discharge ports and flush the pump from the side (if possible) as advised. This forces any trapped solids or dried debris out. Regular flushing (with water or a cleaning solution) prevents build-up that could stress the stator.
Protect Spare Parts: Keep spare stators and rotors on hand, ideally under protective covers to prevent drying or damage. When storing the pump for idle periods, coat exposed parts to avoid corrosion.
Regular Inspections: Don’t set and forget. Check your PCP at least once a month if it’s in heavy use (or after any unusual operation). Catching minor wear early lets you re-chrome a rotor instead of buying new one.
Progressive cavity pumps are built tough, but they do require scheduled attention. If they handle sand, slurry, or adhesive fluids, inspect them after each heavy run. When you maintain these pumps diligently, they offer consistent, pulsation-free flow just don’t neglect them or you’ll waste that advantage.
Tailor your maintenance to WA’s climate. Unlike freezing regions, Perth doesn’t need “antifreeze”, but autumn still brings its own challenges:
Reduced Rainfall: With less autumn rain in recent decades, water supplies may be low. Drainage tests are critical: make sure roofs, gutters, and pits divert water properly so pumps aren’t overwhelmed by unexpected inflows. If you pump from tanks or dams, check that inlets aren’t clogged from dust and that backup supply lines are ready.
Dust and Heat Exposure: Summer dust can accumulate on pumps. Clean all vents and covers to prevent overheating. If your pump lives outside, consider a UV-stable cover or shade to prolong its life.
Storm Prep: Autumn can bring storms. Check that your outdoor pumps are securely mounted. Tie down loose hoses or electrical conduits to prevent storm damage. Ensure float switches and overflows in sumps have secure alarms.
Adjust Schedules: If you use timed irrigation or thermostat-controlled pumps, reset schedules to match shorter daylight and cooler weather. For example, frost prevention might require additional watering early even if average needs drop.
Inspect After Summer: Review any wear from heavy summer use. Bearings stressed by heat or dry-run events should be re-greased or replaced. If electricity rates have spiked, double-check your pump’s efficiency (a worn pump draws more current).
By thinking locally, you catch problems that generic checklists miss. Remember, autumn maintenance isn’t a luxury it’s strategic. If you delay for spring, you’re just postponing headaches. Call it like it is: doing this now prevents downtime when you can’t afford it.
Before you begin, assemble your kit. This prevents excuses like “I had to run to the store.” Essential items include:
Basic tools: Wrenches, pliers, screwdrivers, socket set, and a pipe wrench for fittings.
Replacement parts: Extra gaskets, O-rings, mechanical seals, hose clamps, foot valves, and any filter cartridges.
Lubricants: Pump oil or grease, plus castor oil for PCP rotors if recommended.
Cleaning supplies: Rags, brushes, a mild detergent or flushing solution, and a bucket for draining.
Pressure gauge: For testing output pressure and verifying gauge accuracy.
Electrical tester: A multimeter for checking voltage and continuity on motor connectors (if you have electrical skill; otherwise have your electrician do it).
Safety gear: Rubber gloves, eye protection, and lock-out tags for electrical work.
Yes, it’s tedious. But the cost of repairing an emergency pump crash at 3 a.m. is far higher than a morning of basic maintenance. Organize your tools and parts before starting. Even the smartest person can fumble if they leave half their kit in the shed.
Q: How often should I service my water or pressure pump?
Regular checks: Do a quick visual inspection monthly during active months (summer/fall).
Seasonal service: Perform a full maintenance routine at least twice a year – we recommend once in autumn and once in spring.
Manufacturer’s guidance: Always follow any maintenance interval recommended by your pump’s maker.
Q: What are the warning signs my pump needs work?
Unusual noises (grinding, rattling) or excessive vibration when running.
Visible leaks around the shaft seal or plumbing.
Noticeable drop in water pressure or flow rate.
Frequent tripping of breakers or overheating (motor feels very hot).
Run cycles becoming irregular (short cycling or long priming).
If you spot any of these, don’t wait fix the issue immediately.
Q: Do I really need a professional to maintain the pump?
Most tasks are DIY-safe: Cleaning, tightening fittings, replacing seals or filters, and basic lubrication you can do yourself.
Electrical work requires a pro: WA law mandates licensed electricians for any fixed wiring or control adjustments. Leave control box rewiring or motor rewinds to experts.
Complex repairs: If the pump needs disassembly beyond what’s shown in the manual, or if you’re unsure, call a qualified technician.
Q: Should I “winterize” my pump in Perth?
No antifreeze needed: Perth doesn’t freeze, so no need to drain antifreeze.
Watch for debris: Clear leaves and grit from pump housings after autumn storms.
Check insulation: Ensure any exposed pipes are insulated enough for cooler nights (mainly to prevent condensation issues).
Prep for rains: Secure outdoor units and test rainwater harvesting pumps so heavy winter rains don’t catch you off-guard.
Q: What special tips apply to pressure pumps on rural WA farms?
Pump controllers: Consider installing or checking your pump controller or pressure manager. These devices automatically protect against dry-run and maintain constant pressure. They pay for themselves by preventing burnouts.
Water source: Test your water source levels (tank, dam, bore). In WA, water tables can drop; ensure your pump’s intake stays submerged or use a low-level cut-off.
Infrastructure: Inspect irrigation lines for leaks at season change – unnoticed drips in winter become big problems in the hot summer.
Documentation: Keep records of pump inspections; Aussie farms often use logbooks and that discipline helps catch patterns or recurring faults.
If you skimp on these, you’re cutting corners on reliability which isn’t clever, it’s expensive. A well-maintained pump is far less likely to ruin your season’s yield or blow out your budget.
The Davey Dynapond 8000 is a submersible centrifugal pond pump designed for continuous operation (24/7) in fountains, pond recirculation, waterf...
View full detailsThe Tsurumi LSC1.4S is a single-phase submersible portable residue drainage pump designed for ultra low-level water removal down to approximately 1...
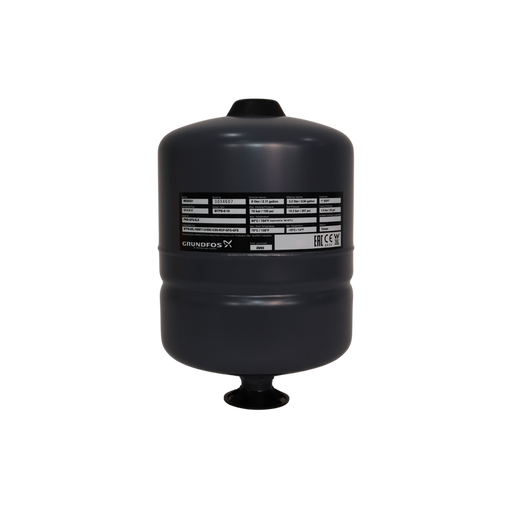
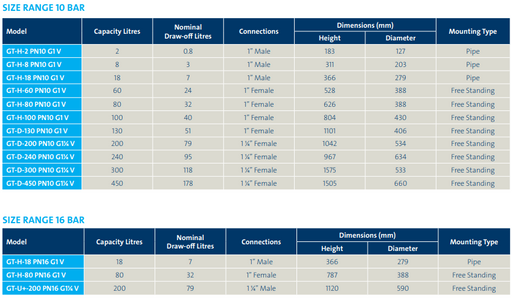
View full detailsThe Grundfos GT-H-18 PN10 G1 V is a compact steel pressure tank designed for drinking water applications. It features a non-toxic butyl rubber d...
View full detailsThis multi-purpose capacitor for a variety of AC applications. It incorporates a plastic housing. Suitable for pool pump, submersible pump, bore pu...
View full detailsThe Grundfos GT-H-60 PN10 G1 V is a steel pressure tank designed for drinking water applications, featuring a non-toxic butyl rubber diaphragm and...
View full details